> For the complete documentation index, see [llms.txt](https://docs.nimbalyst.com/llms.txt). Markdown versions of documentation pages are available by appending `.md` to page URLs; this page is available as [Markdown](https://docs.nimbalyst.com/developer-features/working-with-git.md).

# Working with Git

Commit, check status, and manage branches in Nimbalyst with AI-generated commit proposals and git file status colors in the file tree.

Nimbalyst builds git into the workspace: commit proposals written by the AI, live file status colors, and a visible record of every git operation. Use it to review and commit an agent's work without switching to a terminal or another git client. Most git features require [Developer Mode](/developer-features/turn-on-off-developer-mode.md) and a git-integrated project.

The [git feature page](https://nimbalyst.com/features/git/) covers commit proposals, status colors, and branch handling.

<figure><img src="https://562749618-files.gitbook.io/~/files/v0/b/gitbook-x-prod.appspot.com/o/spaces%2FiVUeHZHlFlZrZt02syRC%2Fuploads%2FNVzHlMBm7rppje3MCpvN%2FWorkTrees.png?alt=media&amp;token=4a26d4c9-1596-48c2-9816-ef18431f2fc4" alt="The git panel next to an agent session, showing uncommitted files, a pending review banner, a commit message box, and a Merge to master button"><figcaption><p>The git panel next to an agent session: uncommitted files, pending reviews, commit box, and merge controls in one place.</p></figcaption></figure>

### Committing

* **Commit with AI** generates an interactive commit proposal from your changes, which you approve or edit before it commits.
* You can also commit manually the files edited in an AI session.
* When committing, use the interactive file picker to select exactly which files to include.
* Pending file reviews are auto-approved when you commit.
* File status colors (green for added, yellow for modified, red for deleted) show what changed at a glance, and status updates appear instantly without polling.
* Nimbalyst detects agent changes made outside its own edit tools too, including `rm`, `mv`, and `echo >>`.
* Sessions show an uncommitted files count, so you can see which sessions have pending changes.

### Multi-Repository Projects

When a project spans several repositories, for example through [attached folders](/file-management/multi-folder-projects.md), the Git panel keeps each one distinct:

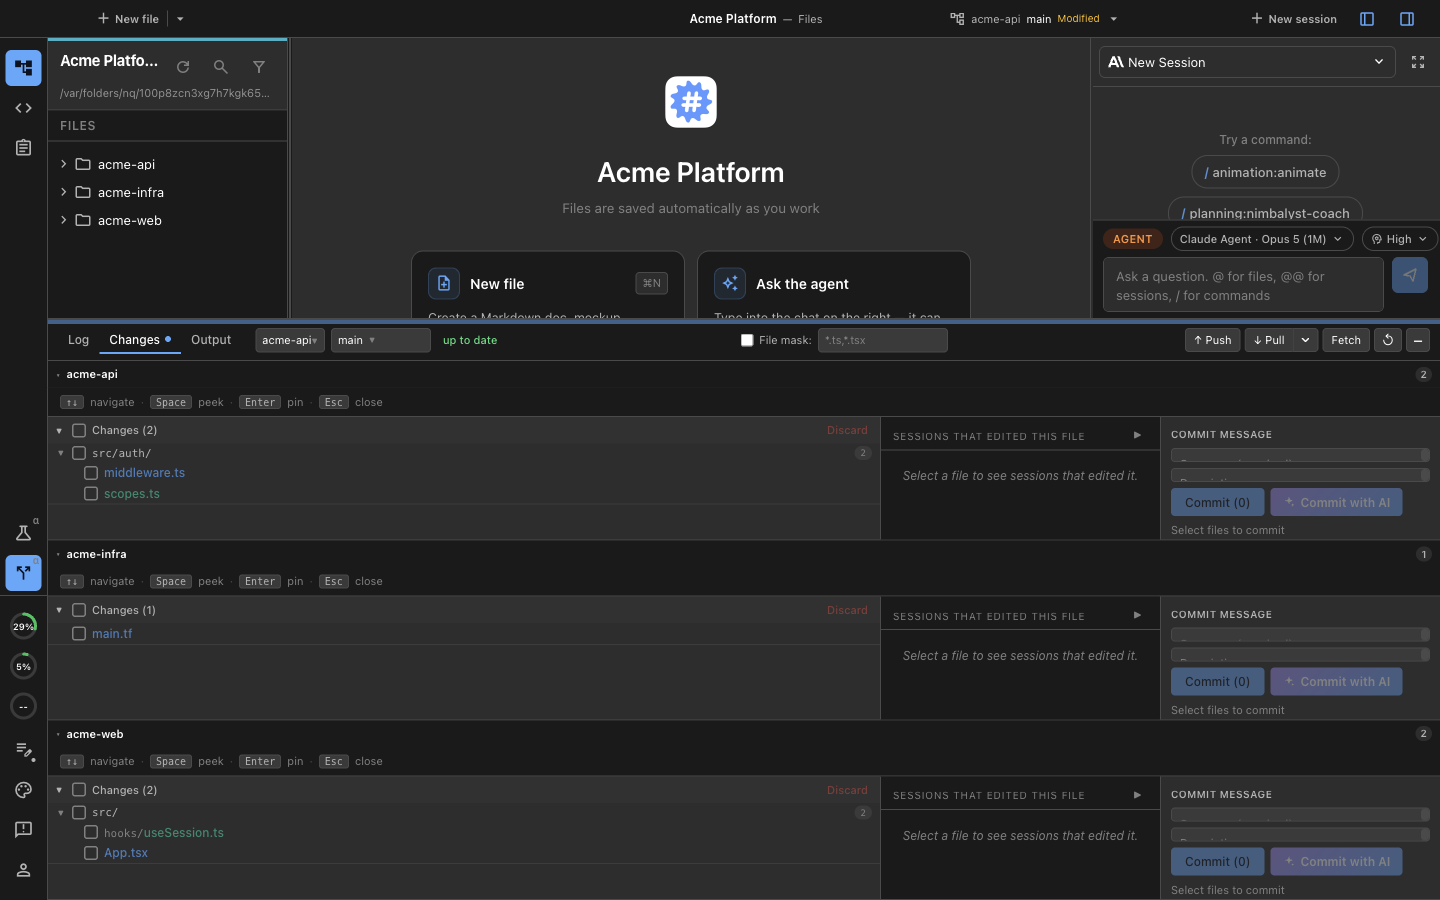
* The **Changes** tab can show every repository in the project at once, each with its own file list and commit box, so you can review and commit each repository without switching between them.
* **Commit with AI** proposes one commit per repository when your changes span several. You approve each proposal separately, and each gets its own message.

<figure><img src="https://562749618-files.gitbook.io/~/files/v0/b/gitbook-x-prod.appspot.com/o/spaces%2FiVUeHZHlFlZrZt02syRC%2Fuploads%2Fgit-blob-da93fdaafa755b63fb4f21791e1a55dcc49ceb2d%2Frelease-git-multi-repo.png?alt=media" alt="The Git panel&#x27;s Changes tab showing three repositories at once, each with its own changed-file list, commit message box, and Commit with AI button"><figcaption><p>All repositories at once in the Changes tab, each with its own file list and commit box.</p></figcaption></figure>

### Files Sidebar in Agent Mode

The sidebar in Agent mode shows a compact list of files the session touched, plus a pending review banner at the bottom when files need review.

<figure><img src="https://562749618-files.gitbook.io/~/files/v0/b/gitbook-x-prod.appspot.com/o/spaces%2FiVUeHZHlFlZrZt02syRC%2Fuploads%2FyqX0TJHHcuszMsxhtWtq%2Fimage.png?alt=media&amp;token=0bf0566f-de9b-4cac-ab22-b8671034641d" alt="An agent session with the Files sidebar on the right, listing Edited files with status badges and Read files, above a Keep All banner for a file pending review"><figcaption><p>The Files sidebar groups a session's files into Edited and Read, with git status badges and a pending review banner.</p></figcaption></figure>

Files are organized into three collapsible sections:

#### Edited

Files the AI has modified. These show:

* **Operation icon**: what the AI did to the file
  * Green `+` = created new file
  * Blue pencil = edited existing file
  * Red trash = deleted file
  * Orange rename = renamed file
* **Git status badge**: current version control state
* **Line counts**: `+5` (lines added) `-3` (lines removed)
* **Pending review indicator**: yellow highlight with a review icon if awaiting your approval

#### Referenced

Files you mentioned in your prompts using `@filename` syntax. You brought these to the AI's attention, but they were not necessarily modified.

#### Read

Files the AI read to understand your codebase. These provided context but were not modified.

### Git Status Badges

For edited files, small colored badges show the git status:

| Badge          | Meaning                          |
| -------------- | -------------------------------- |
| **M** (yellow) | Modified - changes not staged    |
| **S** (green)  | Staged - changes ready to commit |
| **?** (gray)   | Untracked - new file not in git  |
| **D** (red)    | Deleted                          |

Hover over a badge to see "Git status: modified" (or staged, and so on).

### Pending Review Files

When the AI makes changes, those files may show as "pending review":

* **Yellow background**: the file has AI changes you have not reviewed yet
* **Review icon**: a small review icon appears next to the filename
* **Banner**: shows a count like "3 files pending review" with a **Keep All** button

Click **Keep All** to accept all pending AI changes at once, or review files individually by clicking on them.

### File Activity and Git Status in Files Mode

<figure><img src="https://562749618-files.gitbook.io/~/files/v0/b/gitbook-x-prod.appspot.com/o/spaces%2FiVUeHZHlFlZrZt02syRC%2Fuploads%2FofQ11VbSvSuKqbkT8hbh%2Fimage.png?alt=media&amp;token=21a470e3-faba-405a-bcf3-9174d3dbc023" alt="The file tree filter menu in Files mode, with options for Uncommitted Changes, Files Read, and Files Written, and M badges on modified files"><figcaption><p>Filter the file tree by Uncommitted Changes, Files Read, or Files Written; git status badges appear next to each file.</p></figcaption></figure>

The file tree tracks the files the AI interacts with during a session:

* **Git status**: shown with a badge (M for modified, ? for untracked)
* **Uncommitted Changes**: filter to only files and folders with uncommitted changes
* **Files Read**: files the AI examined for context in the session
* **Files Written**: files written to by the AI during the session

### Diff Peek in the Commit Proposal

Each file in a commit proposal has a diff peek popover, so you can see exactly what changed without leaving the widget. It uses the same diff view as the Git extension's changes panel, and the popover is resizable; the size you pick is remembered globally, so the proposal widget and the Git extension stay in sync.

The peek shows a combined HEAD-vs-working diff that includes staged, unstaged, and untracked changes uniformly.

### Diff Peek in the Git Log

In the Git extension, when you select a commit in the log, the commit detail panel lists every file touched by that commit. Click any file in that list to pin its unified diff in the same peek popover.

* Click a file to open the diff for that file at that commit
* **Up/Down** arrow keys step through files in the commit while the popover is pinned
* **Esc** closes the popover
* The popover reuses the size persisted by the changes panel and the commit proposal widget, so all three diff peeks stay in sync

### Git Command History

While a git command is running, the title bar names the command and who started it, so you can tell at a glance whether you or an agent kicked it off.

Open the Git extension's **Output** tab to follow commands run through Nimbalyst. Push, pull, fetch, commit, and other git operations appear as they run and remain available after the panel closes or the renderer reloads. The Output tab also marks the commands an agent ran, keeping your own operations separate from agent activity.

Each entry shows:

* The command and start time
* Live standard output and error output
* Running, completed, failed, or interrupted state
* Duration and exit code
* A suggested recovery step for common git failures

Long errors show a short preview. Choose **View full error** for the complete message or **Copy** to put the error on the clipboard. Use **Clear Log** when you no longer need the completed history; a command that is still running remains attached until it finishes.

This is separate from the shell history in the [Terminal](/developer-features/terminal-window.md). Terminal history remembers commands typed into a shell, while git command history records operations launched by Nimbalyst and their output.

### Auto-Approve Commits

Skip the manual approval step for git commit proposals:

1. Go to **Settings** and enable **Auto-approve commits**, or toggle it directly on any git commit proposal widget.
2. When enabled, Claude's commit proposals are committed automatically without waiting for your approval.


---

# Agent Instructions
This documentation is published with GitBook. GitBook is the documentation platform designed so that both humans and AI agents can read, navigate, and reason over technical content effectively. Learn more at gitbook.com.

## Querying This Documentation
If you need additional information that is not directly available in this page, you can query the documentation dynamically by asking a question.

Perform an HTTP GET request on the current page URL with the `ask` query parameter, and the optional `goal` query parameter:

```
GET https://docs.nimbalyst.com/developer-features/working-with-git.md?ask=<question>&goal=<endgoal>
```

`ask` is the immediate question: it should be specific, self-contained, and written in natural language.
`goal` is optional and describes the broader end goal you are ultimately trying to accomplish on behalf of the user. GitBook uses it to tailor the answer towards what is most useful for that goal.

The response will contain a direct answer to the question and relevant excerpts and sources from the documentation.

Use this mechanism when the answer is not explicitly present in the current page, you need clarification or additional context, or you want to retrieve related documentation sections.